
 A football fan I am not. . . . . .but my father is. Considering the fact that he lived his first thirty years in New Jersey (Go Giants!) and these past 30 years in New England (Go Patriots!) tomorrow will be a very exciting day for him. In a sense his team will win no matter what! In celebration of the event we will be hosting a houseful and for that reason I decided to post up the Lily tutorial a day earlier this week. But before I do. . . . . I wanted to make note of the fact that not only did I not forget to create my item for the day, I actually made up two! But now it's time for you to get to work. . . . . ready, set, go!
 Step 3 - Make an Eyelet
The eyelet is going to be an actual hole in the center of your lily pad through which the doll's peg body will be inserted.
 First things first. . . . . we need to find the center point. To do so fold the lily pad in half.
 Now fold it in half again to create a right angle.
 Make a mark on the corner point of that angle. Lay the lily pad out flat once again and locate the mark you made. If it's too faint to easily spot darken it a bit.
 Take the clothespin peg and place it over the center mark.
 Trace around the bottom edge of the peg.
 Now it's time to sew! Pick one of the selected embroidery flosses. . . . . don't stress over the color choice as this area will not show at all once the pincushion is complete. Thread a needle with approximately a yards length (36") of the floss. Once threaded take a running stitch along the outer edge of the drawn line. Pull the floss through leaving a bit of a thread tail hanging loose.
 Continue working a running stitch all around the circle.
 Sometimes it can be a bit difficult to pull the floss through considering the thickness of the fabrics and interfacing. I find using a thimble and a rubber needle puller makes it oh so much easier on the fingers.
 Once you come round to where you started take one last stitch right through that first one you made!
 The next step makes me cringe every time. . . . . .fold the lily pad in half again and with your most trustworthy scissors make a tiny snip right through the center mark you drew way back when.
 Still cringing, take those same trustworthy scissors and increase the size of the snippet cut so as to create a actual hole. Leave a 1/8" allowance of fabric within the running stitch. Stop cringing.
 Take up the needle once again, put it through the hole, and then back up through the fabric right alongside the thread emerging from your last stitch.
 Holding the emerging thread with your thumb, again pull the needle up through the cut hole and alongside the last stitch taken. This creates an overcast stitch.
 Continue working in this overcasting manner all the way around the circle. Don't worry if your stitches aren't just so.....remember no one's ever going to see this area except for you!
 To finish off, simply pull the needle through a small portion of the overcast stitches. Snip off the remaining floss as well as the tail left hanging at the beginning.
 Finally, just for fun, try out the clothespin peg for size!
 Looking ahead to next week your still going to want a supply of embroidery floss at hand as well as some polyester fiberfil and something to help with the stuffing process. I have a handy little stick but the end of a wooden spoon works just as well. Oh, and if your not into polyester fiberfil feel free to substitute with a stuffing of your choice!
 First things first. . . . . we need to find the center point. To do so fold the lily pad in half.
 Now fold it in half again to create a right angle.
 Make a mark on the corner point of that angle. Lay the lily pad out flat once again and locate the mark you made. If it's too faint to easily spot darken it a bit.
  Take the clothespin peg and place it over the center mark.
 Trace around the bottom edge of the peg.
 Now it's time to sew! Pick one of the selected embroidery flosses. . . . . don't stress over the color choice as this area will not show at all once the pincushion is complete. Thread a needle with approximately a yards length (36") of the floss. Once threaded take a running stitch along the outer edge of the drawn line. Pull the floss through leaving a bit of a thread tail hanging loose.
 Continue working a running stitch all around the circle.
 Sometimes it can be a bit difficult to pull the floss through considering the thickness of the fabrics and interfacing. I find using a thimble and a rubber needle puller makes it oh so much easier on the fingers.
 Once you come round to where you started take one last stitch right through that first one you made!
 The next step makes me cringe every time. . . . . .fold the lily pad in half again and with your most trustworthy scissors make a tiny snip right through the center mark you drew way back when.
 Still cringing, take those same trustworthy scissors and increase the size of the snippet cut so as to create a actual hole. Leave a 1/8" allowance of fabric within the running stitch. Stop cringing.
 Take up the needle once again, put it through the hole, and then back up through the fabric right alongside the thread emerging from your last stitch.
 Holding the emerging thread with your thumb, again pull the needle up through the cut hole and alongside the last stitch taken. This creates an overcast stitch.
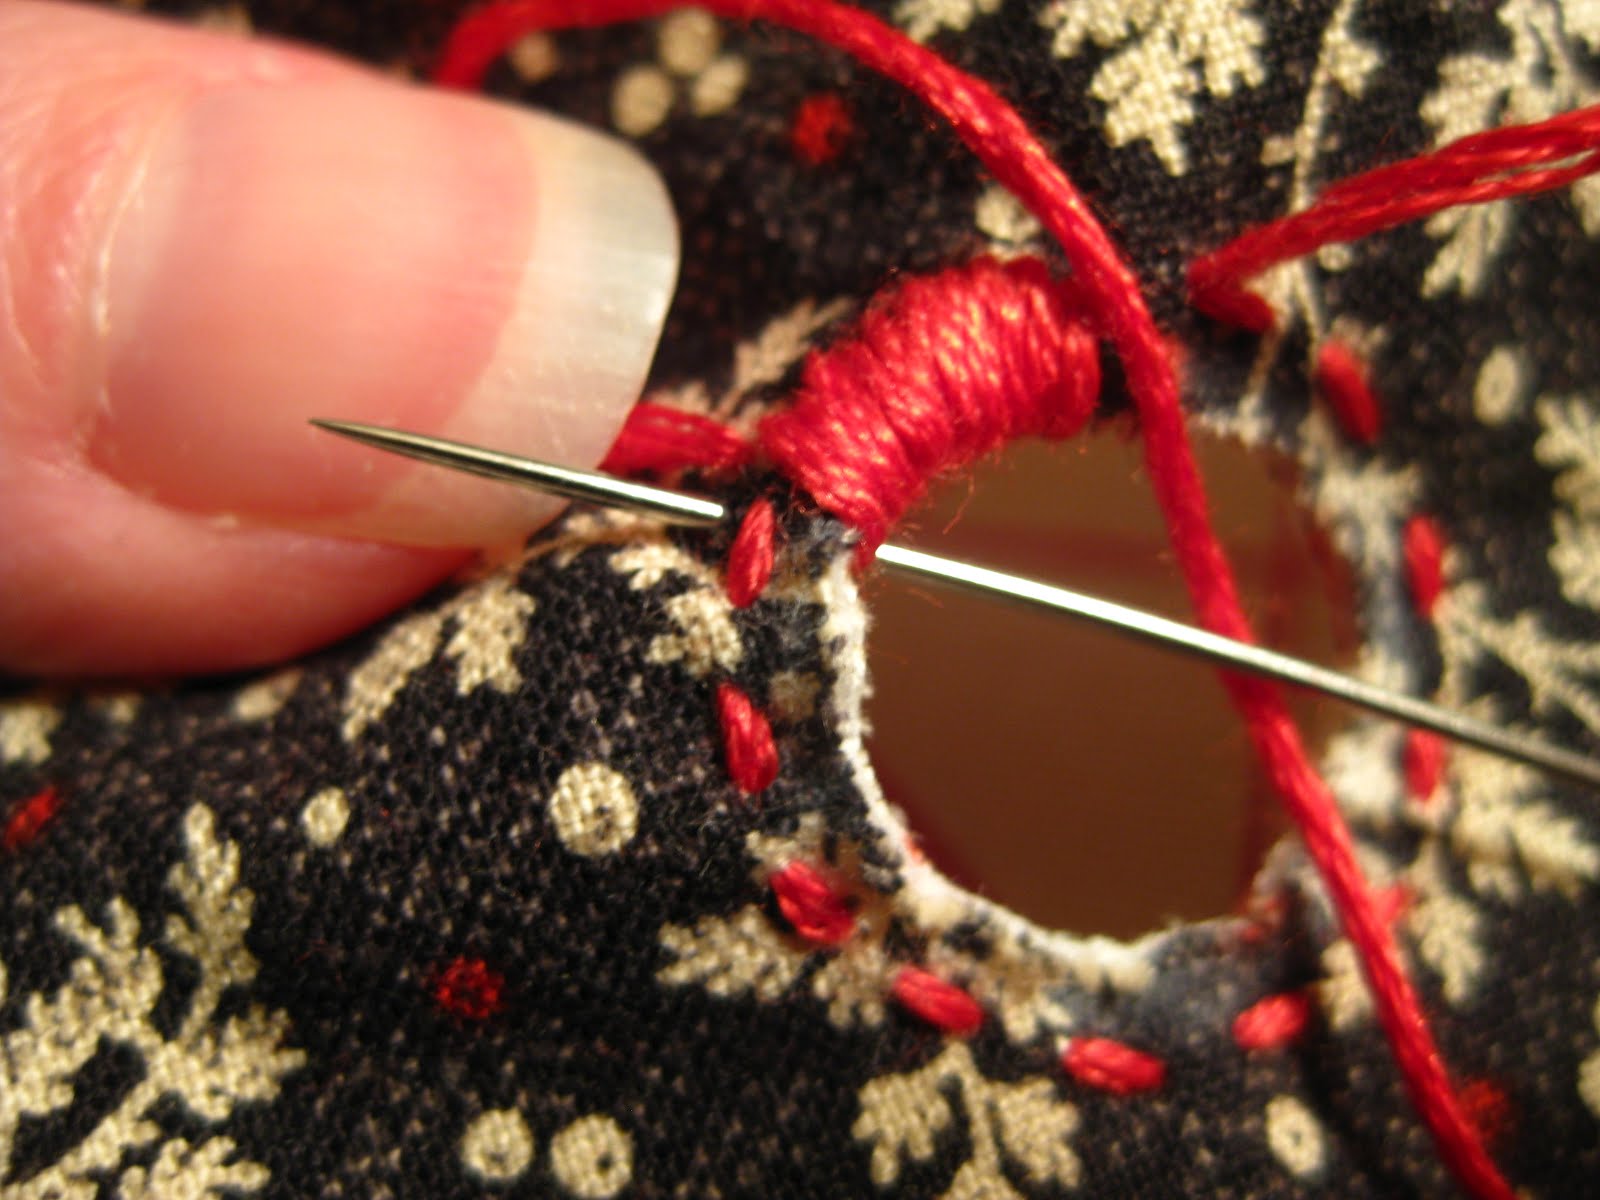 Continue working in this overcasting manner all the way around the circle. Don't worry if your stitches aren't just so.....remember no one's ever going to see this area except for you!
 To finish off, simply pull the needle through a small portion of the overcast stitches. Snip off the remaining floss as well as the tail left hanging at the beginning.
 Finally, just for fun, try out the clothespin peg for size!
 Looking ahead to next week your still going to want a supply of embroidery floss at hand as well as some polyester fiberfil and something to help with the stuffing process. I have a handy little stick but the end of a wooden spoon works just as well. Oh, and if your not into polyester fiberfil feel free to substitute with a stuffing of your choice!
Just came across your Lilys today - they're gorgeous! And now I can even think about making my own! Yay!
ReplyDeleteWelcome and many thanks for your kind words! If you decide to make up your own Lily and have any questions I'd love to help.....natalie jo
ReplyDelete