
 Step 9 - What to Wear
I seem to recall I said we would be back up in the nook for a bit of sewing this time but it was such a beautiful day. I decided instead to move what was needed into the sun room, open all the windows, and catch the hint of spring in the air. I expect any day now to receive an eviction notice pertaining to my takeover of this room!
 To begin select the fabrics and an assortment of threads for creating your Lily's outfit.
I've decided to make her skirt and top out of a black micro check and her apron from the pink floral print. If, however, you want to incorporate another print feel free to make the top and skirt unique from one another.
 Just a wee bit of cutting is required. . . . . .
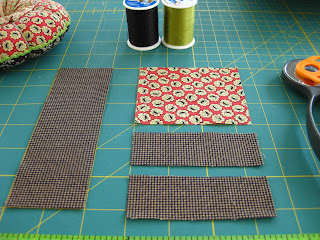 1. For the skirt cut one 2"x 6" piece
2. For the apron cut one 3" x 3.5" piece
3. For the top cut two 1.25" x 3.5" pieces
(*For those of you making a stand alone doll without the pincushion base you may want to make adjustments to your cut of the skirt piece. A 2" x 6" cut will give you a mini version which is great if you want the legs to show. Increase the 2" width to make the skirt as long as desired. To increase the length of the apron make adjustments to the 3" width.)
 Take the two shirt pieces and fold each long edge over so that wrong sides are together and raw edges meet in the middle. Press to hold in place.
 Thread your machine and set it to sew 15 to 18 stitches per inch. More often than not I use two different thread colors. . . . . one fairly neutral for the bobbin and something with a bit of a contrast on the spool as this thread will be seen as the top stitching.
 Stitch along each of the four folded edges. Try to stay within 1/8" from each edge as you do so.
 They'll look something like this!
 Now on to the skirt!
 Just a wee bit of cutting is required. . . . . .
 1. For the skirt cut one 2"x 6" piece
2. For the apron cut one 3" x 3.5" piece
3. For the top cut two 1.25" x 3.5" pieces
(*For those of you making a stand alone doll without the pincushion base you may want to make adjustments to your cut of the skirt piece. A 2" x 6" cut will give you a mini version which is great if you want the legs to show. Increase the 2" width to make the skirt as long as desired. To increase the length of the apron make adjustments to the 3" width.)
 Take the two shirt pieces and fold each long edge over so that wrong sides are together and raw edges meet in the middle. Press to hold in place.
  Thread your machine and set it to sew 15 to 18 stitches per inch. More often than not I use two different thread colors. . . . . one fairly neutral for the bobbin and something with a bit of a contrast on the spool as this thread will be seen as the top stitching.
 Stitch along each of the four folded edges. Try to stay within 1/8" from each edge as you do so.
 They'll look something like this!
 Now on to the skirt!
 With wrong sides together fold one long edge over 1/2" and press. This will mark the hem.
 Open the hem and fold the entire piece in half so that the short edges meet up. Right sides are together this time.
 Stitch along the short edges with a 1/4" seam allowance.
 Gently press open the seam. . . . .
 . . . . . and refold the hem back up into place.
 Top stitch the hem in place 1/8" from the folded edge. . . . .
 . . . . .and tah-dah!
 Last but not least comes the apron. Fold the piece in half so that the 3.5" edges meet up and the right sides are together. No need to press this time. . . . .
 . . . . . simply stitch each short edge with a 1/4" seam allowance.
 Give a slight clip to the corners along the folded edges.
 Turn the piece right side out and very gently push the corners out to a point.
 A quick press will tidy it up nicely!
 Believe it or not your wee Lily's outfit is well on it's way.
 Open the hem and fold the entire piece in half so that the short edges meet up. Right sides are together this time.
 Stitch along the short edges with a 1/4" seam allowance.
 Gently press open the seam. . . . .
 . . . . . and refold the hem back up into place.
 Top stitch the hem in place 1/8" from the folded edge. . . . .
 . . . . .and tah-dah!
 Last but not least comes the apron. Fold the piece in half so that the 3.5" edges meet up and the right sides are together. No need to press this time. . . . .
 . . . . . simply stitch each short edge with a 1/4" seam allowance.
 Give a slight clip to the corners along the folded edges.
 Turn the piece right side out and very gently push the corners out to a point.
  A quick press will tidy it up nicely!
 Believe it or not your wee Lily's outfit is well on it's way.
Job well done...time now for a cuppa if you haven't already one in hand!
 Next week we'll tackle something new. . . . . CROCHET!
 Next week we'll tackle something new. . . . . CROCHET!
We're going to make an edging for the neckline and the bottom edge of the apron. All you'll need on hand is a needle, a spool of thread, and a US7/1.5mm crochet hook.
No comments:
Post a Comment